Sign up for the Powder & Bulk Solids Weekly newsletter.
July 24, 2018
6 Min Read

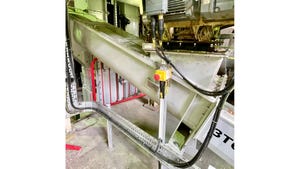
Image 1: For an accurate test, metal samples should be inserted into the product to ensure it passes through the centerline of the aperture.
In order to check food inspection metal detectors are failsafe, manufacturers perform periodic tests, sometimes as often as hourly. Collecting repeatable and reliable metal detector test results on such a frequent basis manually can be labor intensive, time consuming, disruptive to production, and costly. The alternative method - automatic testing - can address all of these issues and enhance manufacturing due diligence.
Both the detectors’ reject performance and failsafe capabilities should be tested regularly, with all the results kept on record to support traceability. Food manufacturers and their respective codes of practice usually dictate the frequency of tests. But what happens in theory can be harder to implement in practice in a busy production environment – especially if the record keeping is done manually on paper.
As a general rule, most food manufacturers will test each metal detector within their factory at the start and end of the production shift, and then throughout the day at regular intervals, typically hourly. In many settings, as soon as one check is done it’s time to start over.
Bulk Inspection Test Challenges
Testing a metal detector manually can be challenging due to access, machine position, product flow, and environmental conditions. This is especially true in gravity metal detectors used predominantly to inspect freefalling bulk products, including flour, corn, grains and rice, pharmaceutical and nutraceutical powders, and cereal.
To get a credible, repeatable, and consistent test reading you must ensure that the test piece passes through the exact center of the aperture. Achieving this consistency can be hit and miss with gravity metal detectors, as there’s the challenge of dropping the test piece in center of the aperture and product flow
With pipeline applications, used widely in meat and pet food processing and to inspect larger quantities of pumped liquid and semi-liquid dairy products, such as cream, yogurt, butter, and soft cheeses, operators can insert the test piece in the gap between the tube and the aperture, which is the most sensitive part of the metal detector. Although this may deliver a great signal, it’s not representative of testing for metal contaminants in the product flow, especially in center of the product flow. Or, the least sensitive position, exactly were testing should occur.
The other alternative to testing pipeline applications is to introduce the test piece to the actual liquid product. However, this method can be even more convoluted and time consuming, requiring operatives to flush product through the pipeline system to recover the test piece or disassembling and resealing the pipe. When done manually, this can increase test times from several minutes to between 10 and 15 minutes. In addition to being a huge drain on resources and a significant disruption to actual production, this method may also increase the risk of introducing contaminants into your product.
It can be equally difficult to get a consistent test reading on bulk conveyor lines where boxed and bagged dry products are inspected. That’s because you are relying on the test piece again passing through the exact center of the aperture, which can be hard to visually determine when products are between 50 and 110 lb. If an operator puts the test piece underneath the product on one test and to the side of the product on the conveyor for the next test, the signal will vary.
Testing frozen bulk items, for example larger cuts of meat, also presents a significant challenge, as being a solid mass you cannot insert a test piece into the middle of the product.
Counting the Cost
The time spent running and documenting tests on every line where a metal detector is installed can cost a business over several thousand dollars a month per line in machine downtime and human resources. For larger factories with multiple lines and units, the monthly outlay can run into tens of thousands of dollars.
Not only is this unproductive, it makes even the leanest manufacturing operation less profitable. Given the growing importance for data integrity, automatic testing tackles this drain on resources and also helps to eliminate the risk of human error.
Some metal detector equipment manufacturers integrate secure, automatic logging of all such information into their systems. This is something where a modest investment up front can lead to savings later on by narrowing the time window during which a problem can go undetected, and reducing the number of suspect products that must be discarded or recalled in case of an incident.
Tips for Manually Testing Your Bulk Metal Detector
Where manual testing is still performed, either independently or in conjunction with automatic testing, bulk manufacturers should:
1. Communicate to all relevant staff your metal detector procedures. In accordance with the manufacturer's recommendations, testing should take place regularly, usually hourly, and between each product changeover. Intervals between tests need to be short enough that if a fault is found, products potentially affected have not left your premises and can be identified, quarantined, and re-inspected.
2. Place test samples in the center of the aperture, which is the least sensitive spot. Because this is highly unlikely to be sitting on top of your product pack, or on the top of the conveyor belt, test samples should be inserted into your product to ensure it passes through the centerline of the aperture (or, in the position on the product that will come closest to this position). This can be especially challenging in gravity systems, as for accurate and repeatable test results, the manual test piece needs to drop down the exact center of aperture and product flow. In this application, multiple drops are recommended for each sample, and the minimum signal of all drops should be utilized.
3. Use good, fresh product. Remember that product characteristics, packaging, and size will likely affect the detection level, so always use the actual product your metal detector is inspecting. And when making test packs, use fresh product, especially for packed vegetables, salad, or meat, as degradation can affect the product’s characteristics. Before inserting the sample, pre-check the packs to ensure they are free of metal contaminants.
4. Check all three metal samples – ferrous, non-ferrous, and stainless steel. Because they are all detected at different levels, even if one metal sample is picked up, that doesn’t necessarily mean the integrity of the detector is proven. To ensure you are detecting stainless steel contaminants that are commonplace in food production machinery, use a non-magnetic 3 series (i.e. 316) stainless steel sample.
5. Test using realistic production conditions, including speed and the way products are presented. This ensures that your reject mechanism is operating correctly. Automatic reject systems must prove that it is rejecting the pack effectively, regardless of where the sample is located (e.g. front or back of pack). An automatic test system must also ensure that subsequent packs are not damaged or trapped or ignore consecutive contaminated packs. Even belt stop systems should be checked to ensure contaminated packs are held at the point where an operative can recover them.
For more information contact Fortress Technology Inc., Toronto, ON, Canada, at 416-754-2898 or visit www.fortresstechnology.com.
For related articles, news, and equipment reviews, visit our Screening & Separation Equipment Zone
Click here for a List of Screening & Separation Equipment
You May Also Like
Editor's Choice


.svg?width=800&auto=webp&quality=80&disable=upscale)